BLOG
ブログ
Est. 2025
JavaScript
Logical OR vs Nullish Coalescing: The Tiny JavaScript Mistake That Could Break Your Apps
In our daily work as JavaScript developers, we often reach for shortcuts like logical OR or nullish coalescing to replace longer ternary operators and keep our code clean. On the surface, these two operations seem to do the exact same thing. They provide a fallback when data is missing. However, beneath that simple syntax lies a fundamental difference in how JavaScript evaluates empty data. Understanding these core fundamentals isn't just a theoretical exercise, it’s a practical necessity. If we don’t master the basics of how these operators work, one simple line of code can lead to unpredictable behavior in production. Now, we’re going back to the basics to see why these two operators are fundamentally different and how choosing the wrong one can quietly break our applications. ## The Foundation: Truthy vs Falsy In JavaScript, every value has an inherent boolean vibe. Even if a variable isn't a literal true or false, JavaScript will treat it as one when we use it in a logical operation. This concept is what we call [Type Coercion](https://developer.mozilla.org/en-US/docs/Glossary/Type_coercion). It means that when JavaScript expects a boolean but gets something else (like a number or a string), it coerces that value into being either **truthy** or **falsy**. When we call a value **truthy**, we mean that it translates to `true` when evaluated in a boolean context. This is the default state in JavaScript, most values we encounter are truthy. This includes obvious things like the number `1` or the string `"Hello"`, but it also includes surprising things, like an empty array `[]` or an empty object `{}`. Even though they are empty containers, they still exist in memory, so JavaScript treats them as truthy. On the other hand, **falsy** values are the specific exceptions to the rule. These values typically represent some form of absence, zero, or invalidity that JavaScript translates to `false`. Based on the [MDN docs](https://developer.mozilla.org/en-US/docs/Glossary/Falsy), there are exactly nine distinct falsy values in the language that we need to keep in mind: 1. `null`: The intentional absence of any value 2. `undefined`: A variable that has been declared but not yet assigned a value 3. `false`: The literal boolean keyword 4. `0`: The numerical zero 5. `-0`: The negative numerical zero 6. `0n`: The BigInt version of zero 7. `""`: The empty string, including '' and `` 8. `NaN`: Not-a-Number, usually the result of a failed mathematical operation 9. `document.all`: The only falsy object in JavaScript ## Logical OR: The "First Truthy" Hunter The Logical OR operator (`||`) is one of the most common tools we use to provide default values. Its behavior is straightforward, it evaluates the expression from left to right and returns the first truthy value it encounters. If all values are falsy, it simply returns the last one. To see this in practice, let’s look at how we handle user settings fetched from `localStorage`. In production, this data is often incomplete. Maybe the user hasn't visited the settings page, or we've just added a new feature that doesn't exist in their local storage yet. ```js const rawConfigData = '{"volume": 0, "autoPlay": false}'; // stringified JSON const config = JSON.parse(rawConfigData); // Now we try to apply these settings with defaults for missing data const volume = config.volume || 50; const autoPlay = config.autoPlay || true; const theme = config.theme || "dark"; // 'theme' is undefined console.log(volume); // Result: 50 (Incorrect! Expected value: 0) console.log(autoPlay); // Result: true (Incorrect! Expected value: false) console.log(theme); // Result: "dark" (Correct!) ``` In this example, we can see exactly where the silent bug creeps in. For the theme variable, the operator worked perfectly because the attribute was missing (`undefined`), which is falsy. But for volume and autoplay, our logic failed us. Even though the user explicitly stored a volume of 0 and disabled autoplay, our code ignored their preferences. Because 0 and false are part of the falsy 9, the `||` operator treated those valid inputs exactly the same as the missing theme. This is why `||` can be dangerous in some scenarios. It doesn't distinguish between data that is missing and data that is intentionally zero or false. ## Nullish Coalescing: The Nullish Filter Nullish coalescing (`??`) was introduced in ES11 back in June 2020. This operator was created specifically to handle the collapsing intent problem. Unlike the OR operator, it doesn't care about the broad list of falsy 9. Instead, it focuses exclusively on nullish values, specifically `null` and `undefined`. If we apply this operator to the exact same scenario we just reviewed, we can see the behavior difference. ```js const rawConfigData = '{"volume": 0, "autoPlay": false}'; const config = JSON.parse(rawConfigData); // We swap || for ?? to distinguish missing data from valid zero-ish data const volume = config.volume ?? 50; const autoPlay = config.autoPlay ?? true; const theme = config.theme ?? "dark"; // 'theme' is still undefined console.log(volume); // Result: 0 (Correct!) console.log(autoPlay); // Result: false (Correct!) console.log(theme); // Result: "dark" (Correct!) ``` By making this one small change, we’ve made our code exponentially more resilient. Because 0 and false are not `null` or `undefined`, the nullish coalescing operator treats them as valid, existing data. It only reaches for the fallback values when the property is truly absent or explicitly set to `null`. This allows us to handle incomplete objects without accidentally overwriting the intentional and valid choices made by our users. ## Conclusion: Right Tool for the Right Task We have seen that the smallest syntax choices often carry the heaviest consequences. Misusing these operators can lead to logic flaws where valid inputs are ignored. When we fail to distinguish between missing data and zero-ish data, we compromise the integrity of our application state. To build reliable software, we have to apply them based on the specific type of data we are handling.

Clean Code
TypeScript
Two Words, Total Safety: The Power of Const Assertion in TypeScript
Most developers assume that using `const` makes their configuration data bulletproof, but under the hood, TypeScript is often quietly undermining that safety. By widening our specific strings into generic types, the compiler treats our internal values as mutable variables. This creates a silent gap where our constants can be accidentally reassigned or fail to match strict literal types, leaving us with a system that just looks like it's protected. The good news? There’s a powerful tool to close this gap called **const assertion**. By adding two simple words, `as const`, we can force the compiler to treat our data as an immutable source of truth. To see this in action, we’ll use a React app path configuration as our study case, learning how to transform a simple object into a self-correcting engine that safeguards our entire routing logic. ## Foundations: Primitives vs. Reference Types To understand why TypeScript behaves the way it does, we first have to look at how data is stored in JavaScript. Every value we work with falls into one of two categories: **Primitives** or **Reference Types**. ### Primitive Types Primitives (string, number, boolean, null, undefined) are the simplest building blocks. A key characteristic of primitives is that they are **immutable**. The value itself cannot be changed once it is created. When we declare a primitive with `const`, TypeScript knows that neither the variable name nor the value can ever be reassigned or modified. This allows the compiler to perform **type narrowing**, where it locks the type to the specific value we provided. ```ts const name = "John"; // Type is exactly "John" (literal type) ``` ### Reference Types Objects and arrays behave differently because they are reference types. These are **mutable**, meaning their internal contents can change even if the variable itself is protected. When we use `const` with an object, we are only protecting the reference (the address in memory). We are telling JavaScript *"This variable will always point to this specific object in this memory address"*. However, we are not telling it *"The properties inside this object will never change"*. ```ts const user = { name: 'John', age: 23, gender: 'male', }; // The type of user becomes // { // name: string; // age: number; // gender: string; // } user.name = "Doe"; // This is allowed! ``` Because TypeScript knows we can change object properties at any time, it cannot safely assume the type of name is a literal value 'John'. ## The Problem: Type Widening The behavior we saw in the object example above is a concept in TypeScript called **type widening**. Because objects are mutable, TypeScript widens a specific value into a generic type (like turning `'John'` into `string`) to remain flexible for any future changes we might make. Let’s take a look at a real-case example using a React App Path configuration to see how this works. ```ts const APP_PATHS = { home: '/', profile: '/profile', settings: '/settings', }; ``` #### The Expectation vs Reality - **The Expectation**: We expect `APP_PATHS.home` to be strictly the literal type '/home' - **The Reality**: TypeScript sees it as a generic string Because the type is just string, TypeScript will happily let us break our own constants without any warnings. ```ts // ❌ This SHOULD be an error, but TypeScript allows it APP_PATHS.home = '/something-else'; // ❌ This typo is also allowed APP_PATHS.settings = '/setttings'; ``` ## The Solution: Const Assertion To solve the widening problem, TypeScript introduced a feature called **const assertion** in version 3.4, released in March 2019. It is important to note that const assertion is unique to TypeScript. It does not exist in standard JavaScript. While JavaScript has `Object.freeze()`, that only works at runtime. Const assertions, on the other hand, provide protection while we are actually writing our code (compile-time). We are telling the compiler *"Treat this entire structure as a literal value. It is now deeply read-only, and the values are exact"*. By adding `as const` to an object, we effectively disable type widening. ```ts const APP_PATHS = { home: '/', profile: '/profile', settings: '/settings', } as const; // Every property is now 'readonly'. // APP_PATHS.home is now specifically the type '/home', not 'string'. ``` If we try to change a value now, TypeScript will stop us immediately: `Cannot assign to 'home' because it is a read-only property`. ## From Data to Types: The Single Source of Truth Locking down our object with const assertion is a great win for immutability, but the cool stuff comes when we realize that we can use that data to generate types automatically. In a professional codebase, we prioritize a Single Source of Truth. This means that when we change a value in one place, the rest of the system should adapt without us having to manually update multiple files. You might ask *"Why go through the trouble of deriving types? Can't I just manually write a Union Type like `type Path = '/home' | '/settings'` and be done with it?"* To see why that's a risky path, let's compare both approaches. ### The Manual Way In this approach, we are forced to maintain the data and the type as two separate entities that just happen to look like each other. ```ts // 1. The Data (What the app uses at runtime) export const APP_PATHS = { home: '/home', profile: '/profile', settings: '/settings', }; // 2. The Type (What the compiler uses at development time) export type AppPath = '/home' | '/profile' | '/settings'; ``` This creates synchronization hell. As our app grows from 2 routes to 50, the likelihood of a human error skyrockets. If we add a new route, let's say `chat: '/chat'` to our object but forget to add it to our type, our UI components will start throwing errors for a perfectly valid route. ### The Automated Way With const assertion, we can flip the script. We let the data be the boss. Instead of trying to keep a type in sync with an object, we use the `typeof` operator to "steal" the type directly from the configuration we already wrote. ```ts export const APP_PATHS = { home: '/home', profile: '/profile', settings: '/settings', chat: '/chat', // Add it here once... } as const; // ...and the type updates automatically for the entire project! export type AppPath = (typeof APP_PATHS)[keyof typeof APP_PATHS]; ``` By deriving the type this way, we ensure that our code is strictly DRY (Don't Repeat Yourself). Our configuration object and our type definition are now properly linked. If a path exists in our data, it exists in our types. #### Why do we need `as const` for this to work? If we try to derive a type without using const assertion, the result is far less useful. - **Without `as const`**: TypeScript sees the object values as generic strings. When we derive the `AppPath` type, the result is simply `string`. This doesn't help us prevent typos. - **With `as const`**: TypeScript locks the values into literal types. The resulting `AppPath` type is exactly `"/home" | "profile" | "/settings" | "/chat"`. ## Full Usage: React Router & Type-Safe Routes Now that we’ve built our foundation, we can apply this across our entire React application. By combining our `APP_PATHS` object and the derived `AppPath` type, we can create a system where the Source of Truth flows from our configuration directly into our components. This eliminates the need to manually sync our routing logic with our UI links. #### Defining Routes In our router configuration, we can utilize the `APP_PATHS` object. This ensures that the actual URL strings are defined in only one place. ```ts import { createBrowserRouter } from 'react-router-dom'; import { APP_PATHS } from './constants'; const router = createBrowserRouter([ { path: APP_PATHS.home, element: <HomePage />, }, { path: APP_PATHS.settings, element: <SettingsPage />, }, // ... rest of the routes ]); ``` #### Creating a Reusable Sidebar Menu Now, we create a `SidebarMenu` component. To make this production-ready, we need to follow the best practice of extending the base LinkProps. We use `Omit` to remove the standard, generic `to` prop and replace it with our strict `AppPath` type. This forces the component to only accept paths that actually exist in our configuration. ```ts import { Link, LinkProps } from 'react-router-dom'; import { cn } from './utils/cn'; import { APP_PATHS, AppPath } from './constants'; import { ButtonVariant } from './types/ui.types'; import styles from './SidebarMenu.module.css'; // We extend LinkProps but override 'to' with our strict AppPath type interface SidebarMenuProps extends Omit<LinkProps, 'to'> { to: AppPath; label: string; } export const SidebarMenu = ({ to, label, className, ...props }: SidebarMenuProps) => { return ( <Link {...props} to={to} className={cn(styles.menu, className)} > {label} </Link> ); }; ``` #### Putting it Into Action Because we are using the `AppPath` type, our component now acts as a "Guard." It will only allow us to pass paths that actually exist in our configuration. ```ts // ✅ Perfectly Type-Safe: The compiler knows this exists <SidebarMenu to={APP_PATHS.home} label="Home" /> // ❌ TypeScript Error: The compiler blocks this because "/dashboard" // is not part of our defined AppPath union type. <SidebarMenu to="/dashboard" label="Dashboard" /> ``` ## Conclusion: Let the Data Lead Professional TypeScript is about building self-correcting systems. By mastering const assertion, we allow our data to define the rules of our application. This shift makes our codebase significantly more resilient. Typos are caught instantly, scaling routes becomes effortless, and refactoring a URL is as simple as updating a single line of code.

Clean Code
JavaScript
Escape the Magic String Nightmare
You’ve been debugging for two hours. Your code isn't crashing, but your "Logout" button just isn't working. You’ve checked the logic and the API calls. Everything looks perfect. Then you see it. In one file, you wrote `setCookie('user-token')`, but in your logout function, you wrote `removeCookie('user_token')`. A single dash instead of an underscore. No error message. No red lines in VS Code. Just a silent failure and two hours of your life you’ll never get back. Welcome to the Magic String nightmare. ## What Exactly is a Magic String? In software engineering, a magic string is a literal value, like a URL, a cookie name, or a storage key, that is hardcoded directly into your logic multiple times. They are called "magic" because they appear out of nowhere. They have no central definition. If you have a string "/admin" in ten different components, those ten strings aren't actually "connected". They are just ten random pieces of text that happen to look the same. ## The Nightmare of Scattered Changes Hardcoding strings might seem easy when you’re starting a small project. But as soon as your app grows, magic strings become a massive headache. ### Scenario A: The Route Change Imagine you need to change your settings page URL from "/settings" to "/account/settings". - **The Manual Way**: You have to search through your entire codebase for that specific string. It might be hidden in your Navbar, a Sidebar link, a redirect after login, or deep inside a random button component. - **The Risk**: In a large project, it is almost impossible to find every single instance. If you miss even one file, you’ve just created a broken link. Your users will click a button and end up on a 404 page because one hidden magic string was left behind. ### Scenario B: Cookies and Storage Whether you are using local storage for theme preferences or secure cookies for sessions, the problem is the same. - **The Manual Way**: You have to manually update every get, set, and remove call in your entire app. - **The Risk**: Hardcoding strings makes it incredibly easy to use the wrong key. If you save a data using the name "user-settings" but try to read it using "user_settings", your app will simply return `null`. There is no error message or warning, just a feature that silently stops working because the keys don't match. ## Can't I Just Use Find and Replace? You might think, *"I can just use 'Find and Replace' in VS Code"*. Yes, but search-and-replace is dangerous. What if you search for "/user" to change a route, but it accidentally replaces a piece of text in a comment or a different API endpoint called "/user-stats"? The truth is that manual searching is inefficient. Professional engineers don't spend their time hunting down strings. They build systems where they only have to change a value once. ## The Level 1 Escape: The Source of Truth The first step to escape the nightmare is to stop typing strings inside your functions. Instead, you create a Single Source of Truth using a constant object. ```js // ./constants/cookies.js export const COOKIE_KEYS = { ACCESS_TOKEN: 'access_token', USER_ID: 'user_id', USER_EMAIL: 'user_email', USER_NAME: 'user_name', USER_ROLE: 'user_role' }; // ./constants/routes.js export const ROUTES = { LOGIN: '/login', REGISTER: '/register', HOME: '/', CHAT: '/chat', SETTINGS: '/settings' }; ``` Now, look at how much cleaner your code becomes: ```js import { COOKIE_KEYS } from './constants/cookies'; import { ROUTES } from './constants/routes'; setCookie(COOKIE_KEYS.ACCESS_TOKEN, accessToken); navigate(ROUTES.SETTINGS); ``` Why this is better: 1. **Change Once, Update Everywhere**: If you change the value of ``ROUTES.SETTINGS`` in your constants file, every single link in your app updates automatically. 2. **Editor Autocomplete**: You don't have to remember if you used a dash or an underscore. As soon as you type `COOKIE_KEYS.`, your editor will show you exactly what's available. 3. **Zero Typos**: If you mistype a variable name, your code will actually throw an error, telling you exactly where the problem is. ## The Journey Doesn't End Here Moving your magic strings into a constants file is a huge win for your productivity. You’ve moved from "guessing" to "knowing" your code is correct. But if you are using TypeScript, there is an even more powerful way to handle this. What if the compiler could force you to only use valid routes? What if you could get "God-mode" autocomplete for every key in your app? In my next post, I’ll show you an underrated but powerful TypeScript feature called `as const` that makes your constants 100% type-safe. Until then, go check your project. How many magic strings are waiting to break your code today?

Frontend
SEO
Social Media
Make Your Links Pop with OG Tags
Ever shared a link on social media and it looked boring? Just a plain URL with no preview image or description? That's where Open Graph tags come to the rescue. In this post, we'll dive into what Open Graph tags are, why they matter, and how to implement them to make your links stand out on social platforms. ## What Are Open Graph Tags? Open Graph (OG) tags are meta tags used in the `<head>` section of a webpage to control how content appears when shared on social media platforms like Facebook, Twitter, or LinkedIn. These tags allow us to specify titles, descriptions, images, etc, ensuring a visually appealing and informative preview when links are shared. ## Why Are OG Tags Important? OG tags play a crucial role in optimizing social media sharing. Here’s why they matter: - **Better Visibility**: Properly configured OG tags make shared links more visually appealing and engaging. - **Higher Click-Through Rates (CTR)**: A compelling title and eye-catching image encourage more users to click. - **Brand Consistency**: They ensure that the right title, description, and image are shown consistently across different platforms. - **SEO Benefits**: While OG tags don’t directly impact rankings, they boost social engagement, which can indirectly improve SEO. ## Implementing OG Tags in Next.js If you’re using the pages directory in Next.js, you can add OG tags inside the `<Head>` component from next/head. ```tsx import Head from "next/head"; export default function HomePage() { return ( <> <Head> <title>Leonard Tarigan</title> <meta property="og:title" content="Leonard Tarigan - Software Dev" /> <meta property="og:description" content="Bring your ideas to life!" /> <meta property="og:image" content="https://example.com/og-image.jpg" /> <meta property="og:url" content="https://example.com" /> <meta property="og:type" content="website" /> </Head> <main> <h1>Welcome to My Website</h1> </main> </> ); } ``` Or if you’re using the new app directory introduced in Next.js 13, you can define OG metadata using the metadata object in a layout or page file. ```tsx import type { Metadata } from "next"; export const metadata: Metadata = { title: "Leonard Tarigan", openGraph: { title: "Leonard Tarigan", description: "Passionate software developer. Let's bring your ideas to life!", images: ["https://example.com/og-image.jpg"], url: "https://example.com", type: "website", }, }; ``` ## Implementing OG Tags in Nuxt.js In Nuxt.js, we can utlize the built-in `useHead` composable to define meta tags, including OG tags. ```vue <script setup lang="ts"> useHead({ title: "Leonard Tarigan - Software Dev", meta: [ { property: "og:title", content: "Leonard Tarigan" }, { property: "og:description", content: "Passionate software developer. Let's bring your ideas to life!", }, { property: "og:image", content: "https://example.com/og-image.jpg" }, { property: "og:url", content: "https://example.com" }, { property: "og:type", content: "website" }, ], }); </script> ``` Alternatively, you can use `useSeoMeta` that lets you define your meta tags as a flat object with full TypeScript support. ```vue <script setup lang="ts"> useSeoMeta({ title: "Leonard Tarigan", description: "Passionate software developer. Let's bring your ideas to life!", ogTitle: "Leonard Tarigan - Software Dev", ogDescription: "Bring your ideas to life!", ogImage: "https://example.com/og-image.jpg", ogUrl: "https://example.com", ogType: "website", }); </script> ``` ## Checking Your Website’s OG Tags You can check your website’s existing Open Graph metadata using [opengraph.xyz](https://opengraph.xyz). This website allows you to preview how your webpage appears when shared and helps identify any missing or incorrect OG tags. 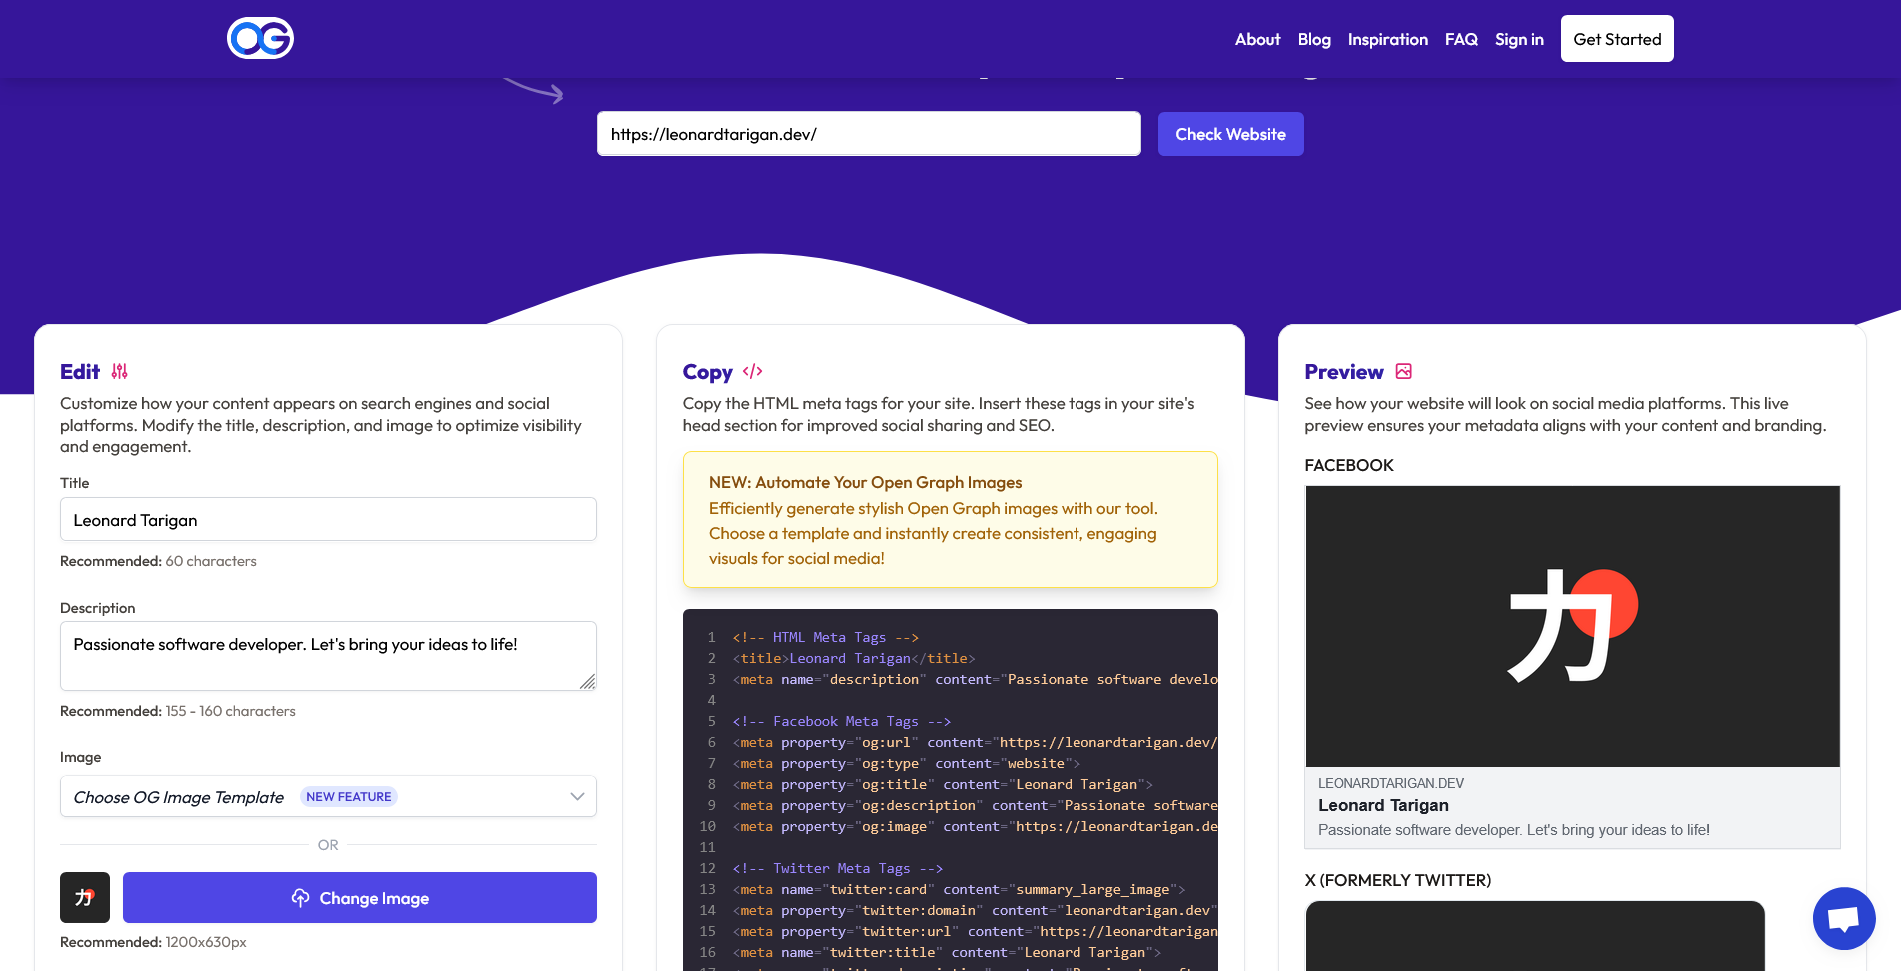 ## Conclusion Open Graph tags are a simple but powerful way to enhance your website’s presence on social media. They make your shared links more engaging, increase user interaction, and help maintain brand consistency. By setting up OG tags properly, you’ll ensure your content always looks polished when shared across the internet.

frontend
performance
Debounce for Better Input Performance
Have you ever encountered a situation where a user’s rapid input, like typing in a search bar, caused your app to perform poorly or make too many unnecessary requests? This is where debouncing comes to the rescue. In this post, we’ll explore what debouncing is, why it’s useful, and how you can implement it in your projects. ## What is Debouncing? Debouncing is a programming technique used to ensure that a function is only executed after a certain amount of time has passed since it was last called. It’s particularly useful for optimizing performance in scenarios where a function might be triggered repeatedly in a short period, such as: - **Search input**: When a user types quickly, we don’t want to send a request for every keystroke. - **Window resizing**: We might want to recalculate layouts only after the user has finished resizing the window. Without debouncing, these actions could lead to performance issues, unnecessary API calls, or a poor user experience. ## How Does Debouncing Work? The idea behind debouncing is simple. Instead of executing a function immediately, we wait for a specified amount of time (e.g., 300ms) to see if the function is called again. If it is, we reset the timer. The function only executes when the timer completes without interruption. Here’s a simple analogy. Imagine you’re waiting for someone to stop talking before you respond. If they keep interrupting, you keep waiting. Only when they’ve stopped talking for a while do you finally respond. ## Search Input Problem Let's take search input as an example case. Suppose you have a search bar in your app, and with each keystroke, it triggers an API call to fetch some data based on the input. Sounds straightforward, right? ```tsx export default function DemoApp() { const fetchSearchResult = (keyword: string) => { console.log(`API call for input: ${input}`); }; return ( <div className="App"> <h1>Debouncing Demo</h1> <input onChange={(e) => fetchSearchResult(e.target.value)} /> </div> ); } ``` But what happens when your users type fast or make frequent changes? Without debouncing, every keystroke fires off an API request immediately. So, if you type "hello," it triggers five separate API calls, one for each letter. ```console API call for input: h API call for input: he API call for input: hel API call for input: hell API call for input: hello ``` This approach of making API calls for every single keystroke is inefficient and wasteful. In reality, we don't need or might not want to fetch results for partial words like "h", "he", or "hel". We only want to search for the complete term "hello". Making all these intermediate requests not only puts unnecessary load on our server but can also lead to a condition where results from an earlier request arrive after more recent ones. What we really want is to wait until the user has finished typing (or at least paused briefly) before making the API call. This is exactly where debouncing comes in handy. ## Search Input After Debouncing To simplify the process of debouncing, we can use the [debounce package](https://npmjs.com/package/debounce) from npm. It's a handy tool that streamlines the implementation. The `debounce` function takes two main parameters: 1. **A callback function**: This is the function you want to delay executing 2. **Delay time in milliseconds**: Specifies how long to wait after the last function call before executing In this second code snippet, `fetchSearchResult` is wrapped with the `debounce` function, which delays the API call by 1000 milliseconds (1 second) after the last input change. ```tsx import debounce from "debounce"; export default function DemoApp() { const fetchSearchResult = debounce((keyword: string) => { console.log(`API call for input: ${input}`); }, 1000); return ( <div className="App"> <h1>Debouncing Demo</h1> <input onChange={(e) => fetchSearchResult(e.target.value)} /> </div> ); } ``` Instead of firing off an API call for every character, we now wait for a second pause after the user stops typing. So, if you type "hello," it waits for you to finish typing or pause for one second before making the API request. ```console API call for input: hello ``` ## Conclusion Debouncing is a simple yet powerful technique that can significantly improve the performance and user experience of our applications. By delaying the execution of a function until a certain amount of time has passed, we can avoid unnecessary computations, API calls, or other resource-intensive operations. It’s a small change that can make a big difference.

git
version control
Mastering The Amend Flag
Have you ever made a commit, only to realize you forgot to include some files, mistyped a message, or wished you could make a quick edit without adding a new commit? This is where the `git commit --amend` command shines. The `--amend` option allows you to modify the last commit, saving you from creating a new one just to fix a minor mistake. In this post, we’ll explore how to use the amend flag, its benefits, and when to use it (and when not to). ## Why Use The Amend Flag? When working with Git, commits serve as important snapshots of your project. But what if your commit message has a typo, or you forgot to add a crucial file? Rather than cluttering your commit history with fixes like "forgot this file" or "typo correction," you can amend the last commit to make it cleaner and more cohesive. Common use cases: - **Fixing a Typo in a Commit Message**: You made a commit but realized there's a typo in the message. - **Adding or Removing Files**: Forgot to include a file in the commit or accidentally included the wrong one. - **Updating Commit Content**: Made a minor change to the code that fits better in the last commit than a new one. ## How to Use The Amend Flag Using the amend flag is straightforward. Let’s go through a few scenarios. ### 1. Amending a Commit Message If you only want to change the last commit message, use: ```bash git commit --amend -m "New commit message" ``` This command opens the editor (or directly updates the message if you use the `-m` flag) where you can edit your commit message without affecting any code changes. ### 2. Adding New Changes to the Last Commit If you have uncommitted changes that should be part of the last commit, stage those changes with `git add`, then run: ```bash git commit --amend -m "New commit message" ``` ## Important Considerations While the amend flag is useful, there are some things to keep in mind: - **Only Amend Local Commits**: Amending is safe when you haven’t pushed the commit to a remote branch yet. If you amend a commit that’s already pushed, it can cause issues for others pulling from the same branch. - **Creating a New Commit Hash**: When you amend, Git creates a new commit with a new hash, even if the changes are minimal. This is why amending is best used for commits that haven’t been shared yet. ## When Not to Use The Amend Flag If your commit has already been pushed to a shared branch, amending it can complicate the history for others who’ve pulled the commit. In these cases, it’s better to create a new commit with corrections.
